Personal Info
- created: 06/28/2017
- latest update: 06/30/2017
- by: spiderbuzz
- www.spiderbuzz.com/
- email:
Theme Installation
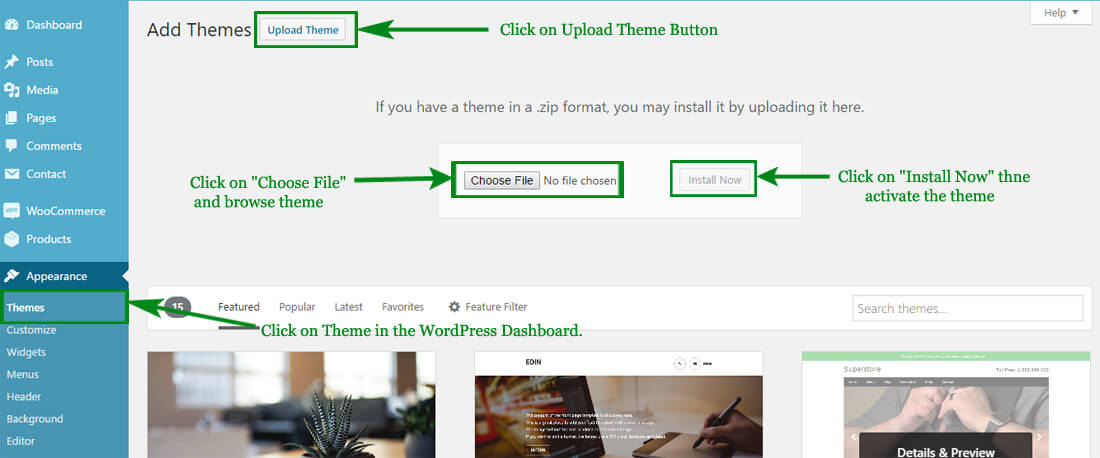
There are two methods to install Personal Info theme. You may either upload the zipped theme file using the WordPress theme installer (Recommended), or you can upload the unzipped theme folder via FTP (Advanced).
Method 1 ( Recommended) : Install Using the WordPress Theme Installer
- Log into your WordPress site and opens the Administration Panel.
- Go to Appearance > Themes in the WordPress Dashboard.
- Click on the Add New button.
- Upload Personal-Info.zip file form your local drive where you have save.
- Click Install Now
Method 2: Install Using File Transfer Protocol (FTP)
- Unzip “Personal-Info.zip” file on your computer.
- Login using FTP client to access your host web server.
- Locate the wp-content folder in your WordPress install files.
- Upload the un-zipped Personal Info folder into the: wp-content/themes folder.
Activate the theme
- Log in to the WordPress Administration Panel.
- Go to Appearance > Themes in the WordPress menu
- Hover over the theme thumbnail and click the Activate button.
Additional information : WordPress Codex – Using Themes
Installing Plugins
To install a plugin in your WordPress admin panel and follow the following steps.
Plugin Installing Method
- Log into your WordPress site and opens the Administration Panel.
- Click Navigate to Plugins > Add New in the WordPress Dashboard.
- Search for the name of the plugin you wish to install which will return a list of potential plugins.
- Click Details to read more about a plugin.
- Click “Install Now” if you wish to install the plugin.
- It may ask if you are sure, and you may proceed. The installation will commence once you confirm to proceed.
- After the plugin is downloaded. Go to Plugins>Installed Plugins. Click “Activate Plugin” to make it available for use.
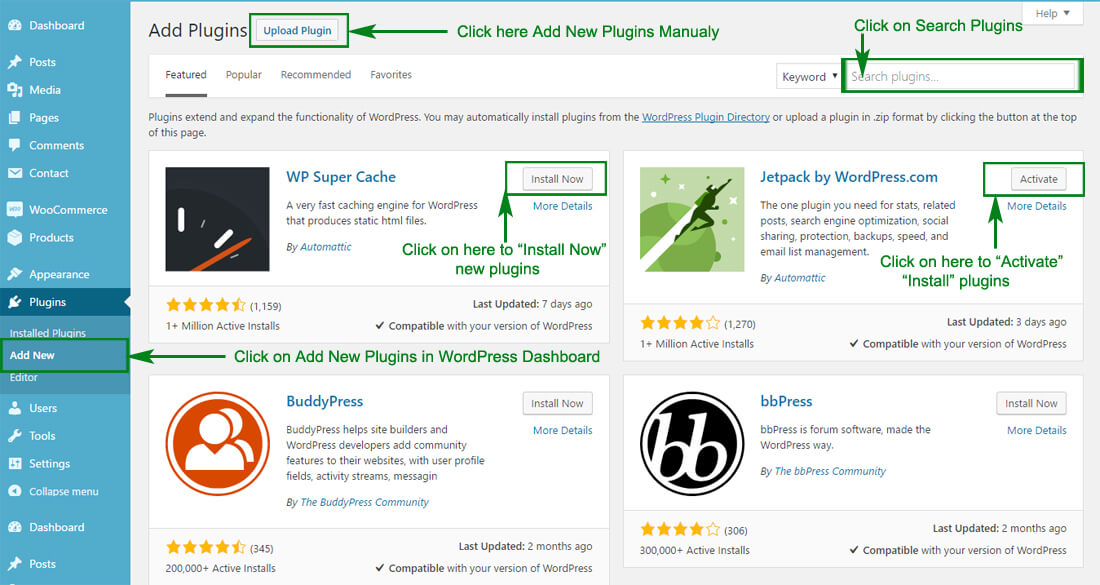
Recommended Plugins : We recommend you to download the following plugins when necessary:
- Menu Image by WordPress.com, by: Adds a field to load the image in a menu item and displays the image inside the link in the menu before the text.
- Contact Form 7 by Takayuki Miyoshi (Contact Form 7 can manage multiple contact forms, plus you can customize the form and the mail contents flexibly with simple markup. The form supports Ajax-powered submitting, CAPTCHA, Akismet spam filtering and so on.)
- Meta Box Plugin by: MetaBox.io (Meta Box plugin is a powerful, professional toolkit for developers to create and handle everything related to custom meta boxes and custom fields for WordPress.)
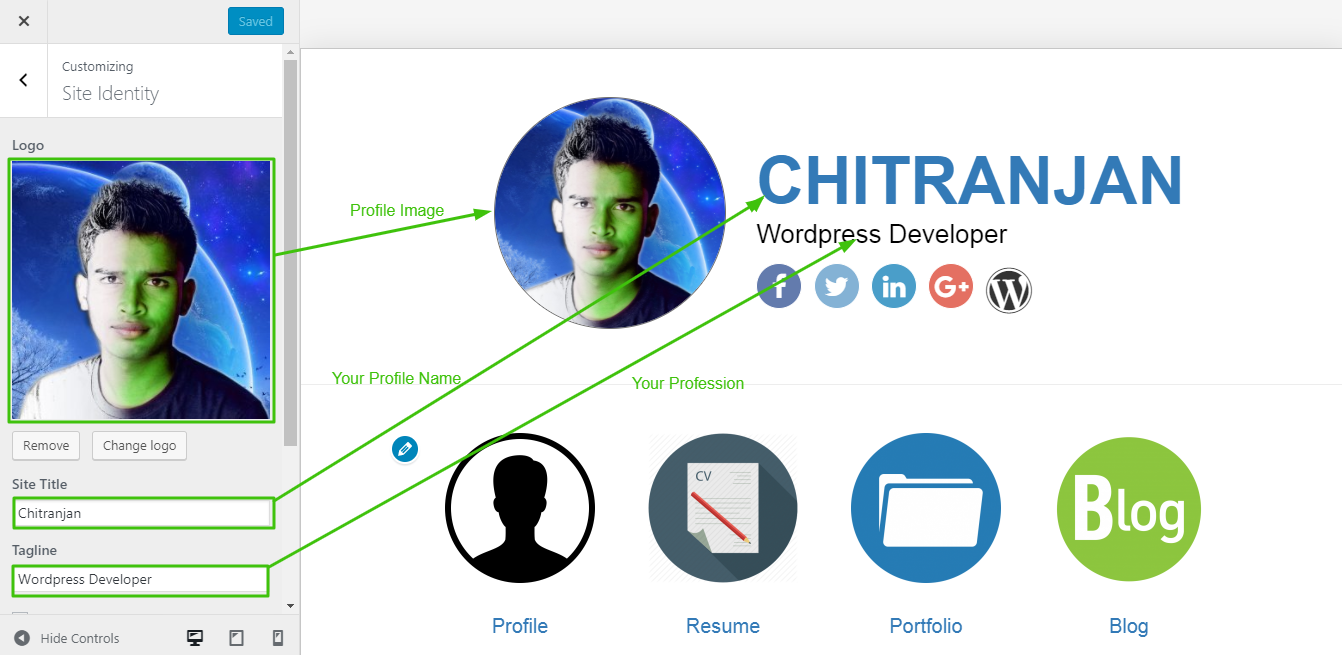
General Settings
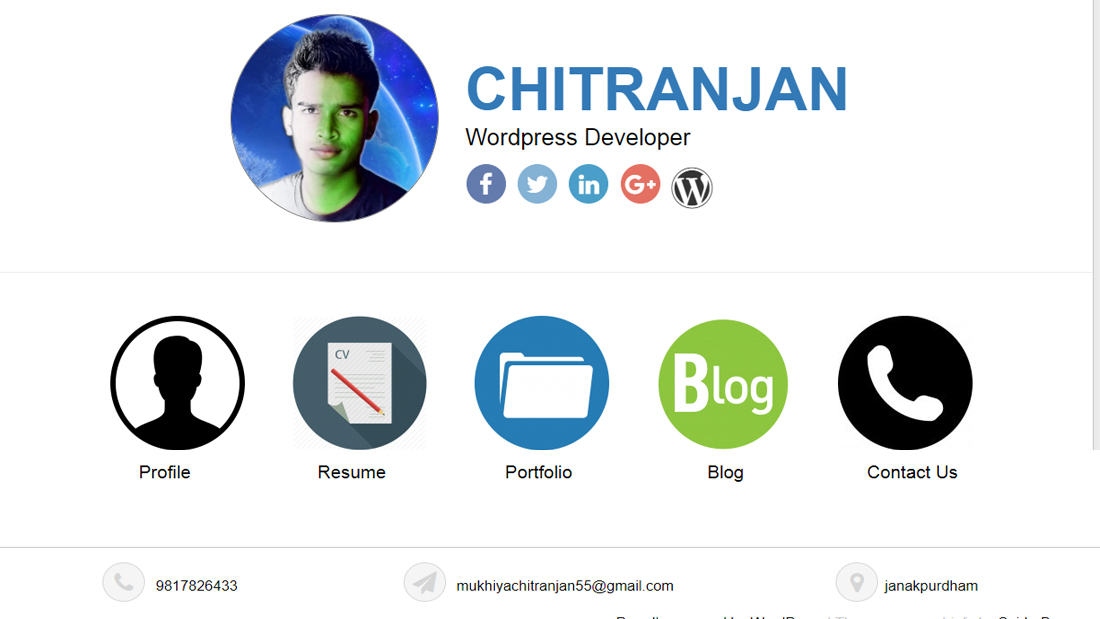
Profile Image/Profile Title/Profile Profession/Favicon (To set up Site Identity)
- Go to Appearance> Customize > Site Identity
- Click Select logo by clicking Select Logo.
- Upload and select the desired image.
- Enter the Profile Title and Tagline
- Check Display Header Text for the Site title and Tagline to appear on your homepage.
- Click Select Image under Site Icon
- Upload and select the desired image. (The Site Icon/ favicon is used as a browser and app icon for your site. The recommended Site Icon size is 512*512 pixels.)
- Click Save & Publish.
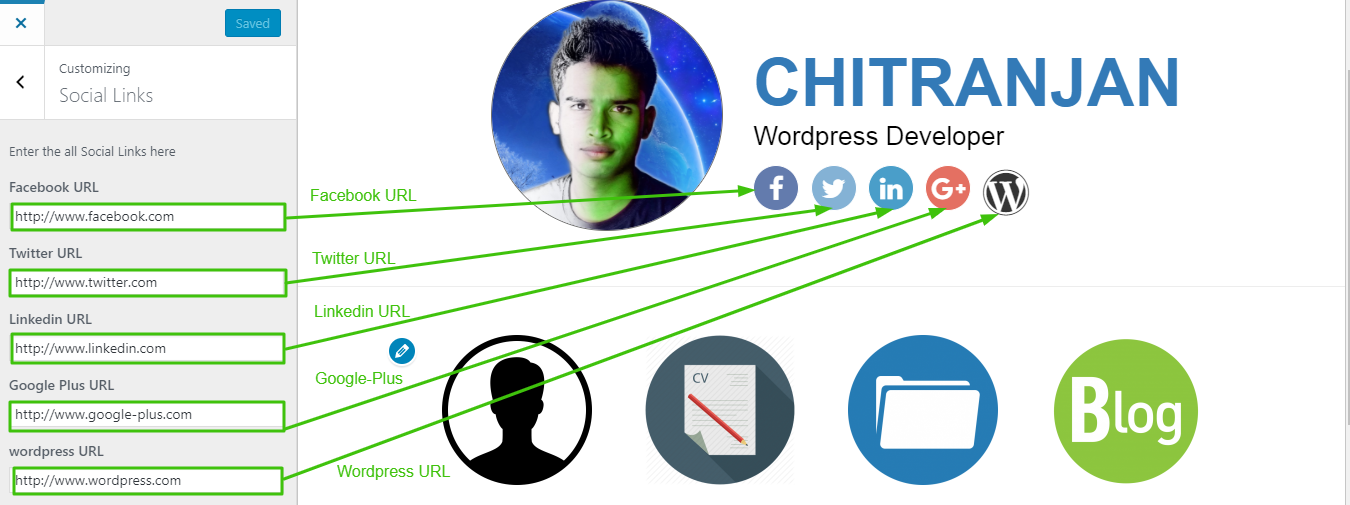
Social Links
- Go to Appearance> Customize > Social Links
- Fill all URL Field in these Section
Personal Info
- Go to Appearance> Customize > Personal Info
- Enter the Phone No, Email and Address

Custom Menu
By default, the menus will fallback to Pages. That means just after activation of the theme, you will see all the pages as menus. If you want selective menus with combination of links, pages, categories then custom menu is what you should be looking for.
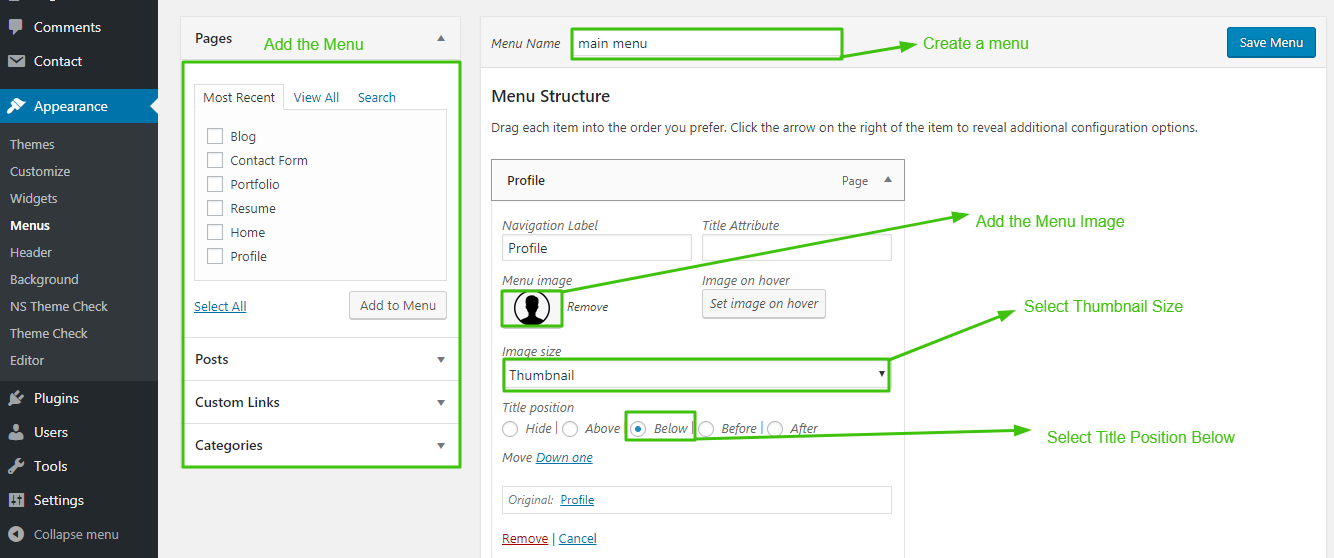
Set up Custom Menu
- Log into your WordPress site and opens the Administration Panel.
- Go to Appearance > Menus in the WordPress menu
- Click on Create a new menu link
- Give a name to your menu in Menu Name and click Create Menu button
- Now choose the pages, categories, custom links from the leftside of your screen by selecting the checkbox and click on Add Menu
- Choose the menu Theme Location per as requirement.
- Click Save Menu after adding required pages, categories in the menu
- Add the Menu Image
- Select the Image Size Thumbnail Size
- Select the Title Position Below
Additional information : WordPress Custom Menu
Profile Page
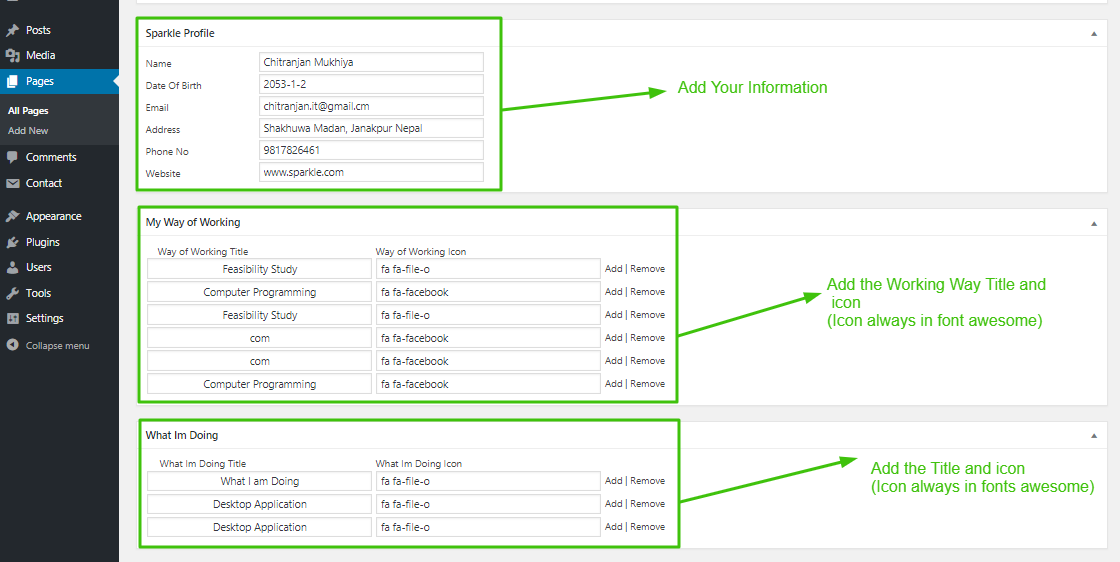
Edit Profile Page
- Go To Profile Page Then
- Add Some Content in a Porfile page Then.
- Profile Metabox Fill Information
- Then go, Way Of Working Metabox Add Title and Icon (Icon Always in Fonts awesome)
- Last One, What I am Doing Title and Icon (Icon Always in Fonts awesome)
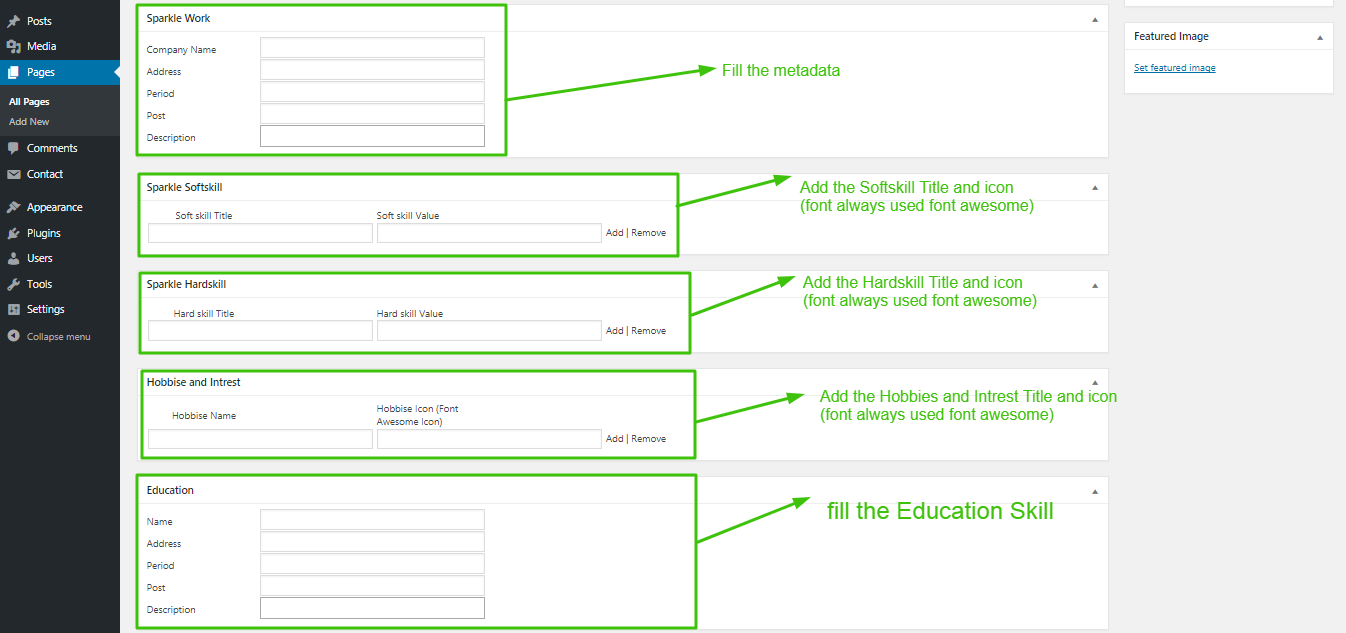
Resume Page
Edit Resume Page
- Go To Resume Page Then
- Add Some Content in a Resume page Then.
- Work Metabox Fill Information
- Then go, Softskill Metabox Add Title and value ( 0 to 100 Values in Percentage )
- Then, Hardskills Metabox Add Title and value ( 0 to 100 Values in Percentage )
- Then Another, Hobbies and Intrest Metabox Add the Title and Icon. (Icon Always in Fonts awesome)
- Last One, Education Metabox Fill all information this filed
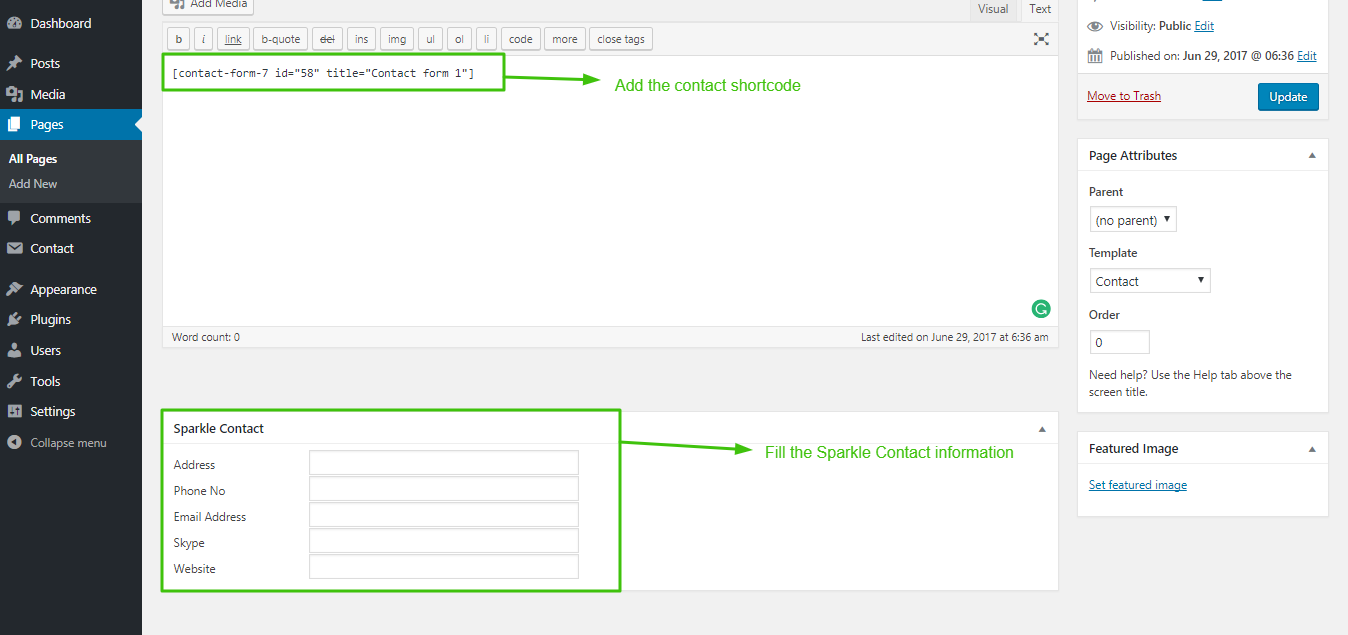
Contact Us Page
Edit Contact Us Page
- Go To Contact Us Page Then
- SpiderBuzz Contact Metabox Fill Information
- Then go To, Contact Section and Edit Contact form and Add This code
- Then, copy the Shortcode and Pest in Contact Page Content Field